Whether you are a developer in Silicon Valley or a creative professional working remotely from Europe, your Mac's connectivity is your lifeline. But when you hit a "No Internet" error or need to bypass a geo-blocked professional resource, the solution lies in your network stack. Mastering how to change your IP address on Mac is more than just a troubleshooting fix—it is about commanding your network identity in the Unix-based ecosystem of macOS.
"In my 15 years of managing macOS deployments for enterprise firms, I've seen that most users struggle with the DHCP handshake. macOS Sequoia and Sonoma handle network access control with much tighter security layers. If you want to shift your identity, you must decide if you need a local Static assignment or a VPN tunnel to mask your global presence."
1. Understanding the macOS Network Stack: Local vs. Public
Before you touch your settings, you must identify which address is causing the issue. Changing the wrong one is a common network documentation mistake that leads to more downtime.
Local IP (Private)
Assigned by your local router. This is your Mac's ID inside your home or office. You change this to fix IP conflict errors with other devices like printers or iPhones.
Global IP (Public)
Assigned by your ISP. This is how websites see your location. You change this to bypass geo-blocks or hide your public data from trackers.
Pro Tip: Is your Mac leaking its location? Use our macOS IP Lookup Tool to audit your current identity before making any shifts.
2. Method 1: Changing IP on macOS Sequoia & Sonoma (Modern GUI)
Apple redesigned the System Settings in recent versions, moving away from the old "Network Preferences." Follow this SOP (Standard Operating Procedure) for the latest interface.
- 01 Click the Apple Menu () and select System Settings.
- 02 Go to Network and select your active connection (Wi-Fi or Ethernet).
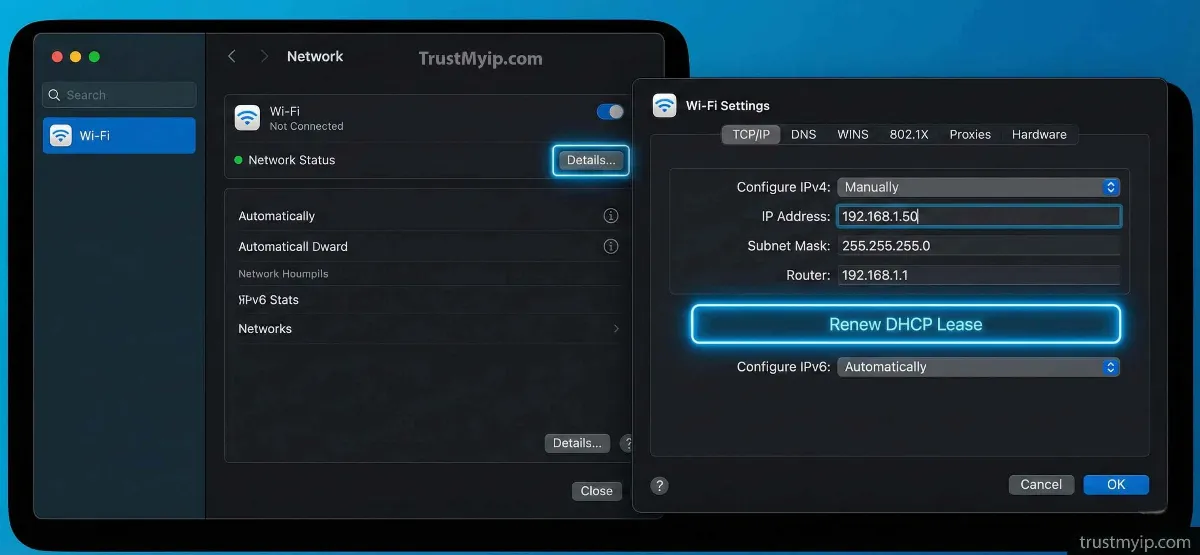
- 03 Click the Details... button next to your network name.
- 04 Select TCP/IP from the sidebar. Under Configure IPv4, choose Manually.
- 05 Enter your new IP address, Subnet Mask, and Router Gateway. Click OK.
3. Method 2: Renewing DHCP Lease (The Instant Refresh)
If your Mac has an IP starting with 169.254 (APIPA), your connection is dead. Renewing the lease forces your Mac to re-negotiate its DHCP allocation with the router.
Navigate to System Settings > Network > Details > TCP/IP. Instead of choosing Manual, click the Renew DHCP Lease button. Your Mac will instantly drop its old address and request a fresh one from the pool. This is the fastest fix for IP conflict errors.
4. Method 3: Using Terminal (networksetup Utility)
For authorized users managing remote servers or automation scripts, the macOS GUI is too slow. The networksetup utility provides direct access to the OSI Layer 2 and 3 settings via the CLI.
Set Static IP via CLI
sudo networksetup -setmanual "Wi-Fi" 192.168.1.50 255.255.255.0 192.168.1.1
This command performs a static assignment instantly. Replace "Wi-Fi" with "Ethernet" if using a wired connection.
Switch Back to DHCP
sudo networksetup -setdhcp "Wi-Fi"
This reverts your Mac to automatic DHCP allocation mode.
5. Method 4: iCloud Private Relay (Native Privacy)
Introduced in recent versions of macOS, iCloud Private Relay is Apple’s native solution for hiding your public IP from trackers while browsing in Safari.
How to Enable
System Settings > [Your Name] > iCloud > Private Relay. Toggle it ON. It masks your identity by routing traffic through two separate Anycast Routing nodes.
The Limitation
Private Relay only works in Safari. For system-wide protection or to access specific US-based servers, you must use a full VPN tunnel.
6. Comparison: macOS IP Management Methods
Use this forensic breakdown to decide which method fits your disaster recovery or privacy goals.
| Method | Target IP Type | Effort Level | Best For |
|---|---|---|---|
| System Settings | Local (Private) | Low (Visual) | Everyday Troubleshooting |
| Terminal (CLI) | Local (Private) | High (Command) | Scripting & Enterprise |
| VPN / Proxy | Global (Public) | Medium (App) | Bypassing Geo-blocks |
7. Troubleshooting: Why won't my Mac IP Address change?
If you've followed the steps above but your location remains stuck, check for these technical constraints:
- Location Services Interference: Your Mac may still be reporting your physical location via GPS/Wi-Fi positioning even if your IP is hidden. Disable Location Services in Privacy & Security settings.
-
DNS Caching: Your browser might be "remembering" your old identity via DNS Resolution. Flush your cache with
sudo dscacheutil -flushcache; sudo killall -HUP mDNSResponderin Terminal. - Static ISP Leases: Some USA-based fiber ISPs assign a static assignment that doesn't change even after a router restart. A high-quality VPN is the only way out in this scenario.
macOS Networking FAQ
Will changing my IP affect my Mac's local printer?
If you change your private IP manually to a different subnet, yes, you will lose connection to local devices. Always stay within the same subnet (e.g., 192.168.1.x).
Does a Mac have a permanent MAC address?
Yes. Every Mac has a hardware address built into its logic board. Learn more in our MAC vs IP guide.
How do I see my IP via Terminal?
Simply type ipconfig getifaddr en0 (for Wi-Fi) or en1 (for Ethernet). This is the fastest way to audit your current identity.
Conclusion: Empower Your Mac's Identity
Mastering how to change your IP address on Mac is a fundamental part of digital hygiene in 2026. From utilizing the modern System Settings interface to executing deep networksetup commands in Terminal, you now have the tools to control your network access control and privacy. Whether you're fixing a minor connectivity bug or shielding your public data from the world, a managed IP strategy ensures your Mac remains a secure and efficient workstation.
Is Your Mac Leaking?
Changing your settings is just the start. Use our forensic toolkit to audit your DNS, detect Proxy leaks, and check your Browser Fingerprint in one click.