Setting up a Shopify store is an exciting milestone for any entrepreneur. You’ve picked your products, designed your theme, and chosen the perfect brand name. But then comes the technical hurdle that stops many in their tracks: Connecting your custom domain. Seeing a "Domain Not Connected" or "SSL Pending" error can be frustrating, but the solution lies in mastering your digital foundation.
"To fix connection errors, you need to dive into your DNS (Domain Name System) settings. This guide provides a professional, deep-dive into performing a Shopify DNS records check and ensuring your A and CNAME records are perfectly configured for 2026."
1. Why Proper DNS Configuration is Critical for Shopify
DNS is essentially the "GPS" of the internet. It tells a customer’s browser exactly which server to visit when they type in your URL. If your DNS records are even slightly off, your store will be inaccessible, leading to lost sales and a poor brand reputation.
For Shopify stores, the platform requires two specific "pointers" working in harmony. Without them, your SSL certificate won't activate, and your site will trigger "Not Secure" warnings in browsers like Chrome and Safari.
DNS Logic Grid
The Core Shopify Records
Points your root domain (e.g., yourstore.com) directly to Shopify’s global IP address.
Points your subdomain (e.g., www.yourstore.com) to Shopify’s hosting cluster.
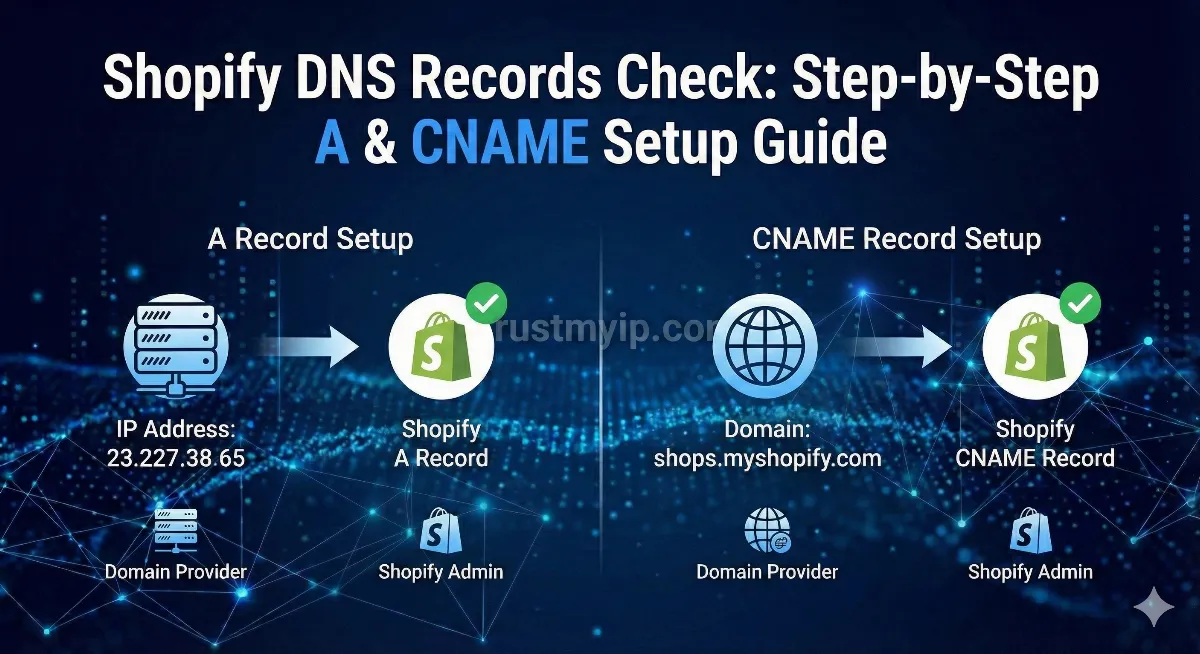
2. The Shopify A Record: The Foundation
The A Record (Address Record) is the most basic type of DNS record. It maps your domain name to the physical IPv4 address of the Shopify server. To point your root domain to Shopify, you must set your A record to: 23.227.38.65.
One of the most common mistakes beginners make is leaving old A records from previous hosting (like Bluehost or HostGator) in their settings. Shopify requires exactly ONE A record. If you have multiple A records for the @ (root) host, Shopify’s verification tool will fail.
3. The Shopify CNAME Record: Handling the "WWW"
The CNAME Record (Canonical Name) acts as an alias. Instead of pointing to an IP address, it points one domain name to another. For the www version of your site, you must point your CNAME record to: shops.myshopify.com.
Why use a CNAME instead of another IP?
Shopify uses a massive network to handle traffic. By pointing to shops.myshopify.com, you allow Shopify to manage the load balancing behind the scenes. If they change their internal server structure, your store stays online because your alias remains the same.
4. Step-by-Step: Setting Up DNS for Shopify
While every domain registrar (GoDaddy, Namecheap, Cloudflare) has a different interface, the technical logic remains identical.
Access DNS
Log in to your registrar and find "DNS Management" or "Advanced DNS" settings.
Edit Root A
Find Host @. Change Value to 23.227.38.65. Set TTL to Automatic (3600).
Edit WWW CNAME
Find Host www. Change Value to shops.myshopify.com exactly.
5. How to Perform a Shopify DNS Records Check
After you save your settings, the changes aren't always instant. This is known as DNS Propagation. Instead of waiting for Shopify's dashboard to update (which can be slow), you can use TrustMyIP to see the "Raw" data being broadcast by global nameservers.
TrustMyIP Verification Process
- Enter your domain into the DNS tool.
-
Verify the A Record section shows
23.227.38.65. -
Verify the CNAME section for
wwwpoints toshops.myshopify.com.
If our tool shows correct values but Shopify says "Unconnected," it simply means Shopify's internal cache hasn't refreshed yet.
6. Troubleshooting Common Shopify Domain Issues
| Issue | Common Cause | Fix |
|---|---|---|
| SSL Pending | CAA Record blocking Let's Encrypt. | Delete old CAA records. |
| Unconnected Status | Stale A records present. | Keep exactly one A record. |
| Cloudflare Error | Proxy (Orange Cloud) is ON. | Turn Proxy OFF (Grey Cloud). |
7. Understanding TTL and Propagation Time
TTL (Time to Live) determines how long servers around the world "remember" your old DNS settings before checking for new ones. If your TTL was set to 86400 (24 hours), it might take a full day for your Shopify store to go live globally.
Pro Tip for Site Migrations
"Before moving a live site to Shopify, lower your TTL to 300 (5 minutes) a day in advance. This makes the final switch almost instantaneous."
8. Final Checklist for a Successful Connection
Verification Dashboard
- Root A Record: Exactly one, pointing to 23.227.38.65.
- WWW CNAME: Points to shops.myshopify.com (NOT your .myshopify.com URL).
- Stale Records: All other root A and CNAME records are deleted.
- Global Check: Verified using TrustMyIP propagation tool.
Frequently Asked Questions
How long does Shopify SSL take to activate?
It typically takes 24 to 48 hours. If it takes longer, check for CAA records or extra A records blocking the issuance.
Can I use more than one A record?
No. Shopify’s system will only verify the domain if there is exactly one root A record pointing to their IP.
Why shouldn't I use my .myshopify.com as the CNAME value?
Using shops.myshopify.com is the standard protocol for Shopify's load balancer. Using your specific store URL can cause issues with SSL provisioning.
Conclusion: Master Your Store's Infrastructure
A successful Shopify store starts with a solid foundation. By mastering your DNS A and CNAME records, you aren't just "connecting a domain"—you are ensuring that your customers have a secure, fast, and reliable path to your products. Don't let technical jargon intimidate you. Use the diagnostic tools at TrustMyIP to keep your digital GPS on track.
Verify Your Shopify DNS Now
Don't fly blind. Check if your A and CNAME records are live globally and resolve your Shopify connection issues in seconds.