You've heard it before — "just change your IP" — but on an iPhone in 2026, that advice means five completely different things depending on what you're actually trying to fix. Are you getting blocked by a streaming service? Trying to fix a "No Internet" error on home Wi-Fi? Bypassing an IP ban on a game server? Or trying to stop advertisers and data brokers from profiling your online behavior? Each of these problems requires a different method, and using the wrong one wastes your time completely.
This updated 2026 guide covers every working method to change your IP address on iPhone — from the 30-second Airplane Mode trick to full VPN encryption, from renewing your DHCP lease to configuring a static IP for port forwarding. We also cover what competitors never explain: why your IP might not change even after you do everything right (CGNAT is usually the answer), and what Apple's latest iOS 18 and upcoming iOS 26 privacy features actually do — and don't do — for your IP privacy. No fluff, no VPN upsells without context. Just the complete picture.

"I've designed privacy architectures for enterprise clients and tested consumer iOS privacy tools extensively — and the number one mistake I see iPhone users make is conflating their local IP with their public IP. Changing your local IP in Wi-Fi settings does absolutely nothing to hide your identity from websites. They never see your local IP — only your public one, assigned by your ISP or carrier.
The second biggest misconception in 2026: people think iCloud Private Relay is a VPN. It is not. Private Relay only covers Safari traffic and some app DNS lookups. Every other app on your iPhone — social media, maps, email, games — still uses your real public IP. For full-device IP masking, you need a proper VPN tunnel. Additionally, with most major US carriers running CGNAT, the Airplane Mode trick won't give you a truly unique public IP anyway — you'll just cycle within a shared pool. Know your tools before you use them."
Quick Answer: How to Change IP Address on iPhone
There are 5 working methods depending on your goal. iCloud Private Relay (iCloud+ required) hides your IP in Safari only. A VPN app changes your public IP across all apps — the most reliable method. Renewing DHCP lease fixes local network errors. Static IP setup is for port forwarding. Airplane Mode may give a new cellular IP, but CGNAT on US carriers limits its effectiveness. Before choosing, identify whether you need to change your public IP (for privacy/geo-unblocking) or your local IP (for connection fixes). Check your current public IP with our TrustMyIP IP checker.
1. Public IP vs Local IP: Which One Do You Actually Need to Change?
This is the most important question to answer before doing anything else. The vast majority of wasted troubleshooting effort on iPhone IP changes comes from people changing the wrong type of IP. Your iPhone has two completely different IP addresses serving completely different purposes, and the methods for changing each are totally distinct.
🌐 Public IP (External)
Assigned by your ISP (home Wi-Fi) or cellular carrier (AT&T, Verizon, T-Mobile). This is the address websites, apps, and online services actually see. It identifies your approximate location and ISP to the outside world.
Change this for: Privacy, hiding location from websites, bypassing geo-blocks, fixing IP bans, stopping targeted advertising by IP.
🏠 Local (Private) IP
Assigned by your home router via DHCP. This identifies your iPhone within your local network (192.168.x.x range). Websites never see this address — it exists only inside your home network.
Change this for: Fixing "connected but no internet" Wi-Fi errors, setting up port forwarding, resolving IP conflicts with other devices on your network.
A critical point most guides skip entirely: changing your local IP does nothing for online privacy. When you manually set your iPhone's local IP in Wi-Fi settings, websites still see your public IP from your ISP — completely unchanged. This confusion causes enormous wasted effort. Use our IP address checker right now to see exactly what your public IP is and what it reveals about your location.
| Goal | IP Type to Change | Correct Method |
|---|---|---|
| Hide from websites / apps | Public IP | VPN or iCloud Private Relay |
| Fix "No Internet" Wi-Fi error | Local IP | Renew DHCP Lease |
| Port forwarding / static setup | Local IP | Manual Static IP Configuration |
| Bypass geo-blocked content | Public IP | VPN (country-specific server) |
| New cellular IP quickly | Public IP (limited) | Airplane Mode (CGNAT-dependent) |
2. Method 1 — VPN: The Only Guaranteed Way to Change Your Public IP
A VPN (Virtual Private Network) is the single most reliable method for changing your iPhone's public IP address. When you connect to a VPN server, all your iPhone's internet traffic is routed through that server. Every website and app sees the VPN server's IP address — not yours. Your real IP is completely hidden behind the VPN's IP.
This works for all apps simultaneously — not just Safari. Social media, streaming apps, games, email, maps — everything goes through the VPN tunnel. This is the critical difference from iCloud Private Relay, which only covers Safari and some DNS traffic.
How to Set Up a VPN on iPhone (iOS 18 / iOS 26)
Download a VPN app from the App Store. Choose a provider with a verified no-logs policy, strong iOS support, and servers in your target location.
Open the VPN app and sign in or create an account. When prompted, tap Allow when iOS asks to add VPN configurations — this is required for the VPN to function.
Select a server location. Choose the country or region whose IP address you want to appear from. For geo-unblocking, match the server to the content's region.
Tap Connect. The VPN icon (key symbol) appears in your iPhone's status bar when active. Visit TrustMyIP.com to confirm your IP has changed to the VPN server's address.
Optional — Enable Kill Switch: In Settings → General → VPN & Device Management, configure your VPN to block internet if the VPN drops. This prevents accidental IP exposure.
⚠️ Important: Check for VPN + iCloud Private Relay Conflicts
In iOS 18 and later, running a VPN simultaneously with iCloud Private Relay can cause conflicts. Apple's support documentation confirms that third-party VPN apps and kernel extensions may be incompatible with Private Relay. If you're using a VPN, Private Relay should be temporarily disabled — Settings → [Your Name] → iCloud → Private Relay → Turn Off Until Tomorrow. Use one or the other, not both simultaneously.
3. Method 2 — iCloud Private Relay: Apple's Built-In Privacy Tool
If you have an iCloud+ subscription, Apple's iCloud Private Relay is a built-in privacy feature that hides your IP address in Safari — without installing any third-party app. It uses a dual-hop architecture designed so that no single entity, not even Apple, can see both who you are and what you're browsing.
iCloud Private Relay — How the Dual-Hop Architecture Works
Relay 1 (Apple's Relay):
Knows your real IP address and Apple Account — but does NOT know which website you're visiting. It strips destination information before forwarding.
Relay 2 (Third-Party CDN Relay):
Knows the destination website — but does NOT know your real IP or identity. It assigns you a generic IP from the target country/region.
The result: Websites see a generic IP that reflects your country and time zone — not your ISP or home location. Neither relay has the complete picture of who you are AND where you're going.
How to Enable iCloud Private Relay (Updated iOS 18 / iOS 26 Steps)
1. Open Settings → tap your name at the top → tap iCloud.
2. Tap Private Relay → toggle Private Relay ON.
3. Tap IP Address Location and choose:
- • Maintain General Location — your country and approximate region are preserved. Local content in Safari still works correctly.
- • Use Country and Time Zone — broader anonymity, IP shows only your country and time zone. Some location-based features may stop working.
4. To disable for a specific Wi-Fi network: Settings → Wi-Fi → tap the network's ⓘ → toggle off Limit IP Address Tracking.
5. To disable for cellular: Settings → Cellular → Cellular Data Options → toggle off Limit IP Address Tracking.
iCloud Private Relay Limitations You Must Know
- • Safari only — other apps (Instagram, YouTube, Gmail, etc.) still use your real IP.
- • Not available everywhere — not supported in China, Russia, Belarus, Colombia, Egypt, Kazakhstan, Saudi Arabia, South Africa, Turkmenistan, Uganda, and the Philippines.
- • Cannot change country — Private Relay keeps you in your own country. It does not let you appear to be in the US from abroad.
- • Some websites block it — sites using IP-based rate limiting may show errors. Tap the page menu in Safari → Show IP Address to temporarily bypass.
- • iCloud+ required — starts at $0.99/month. Not available on free iCloud accounts.
4. Method 3 — Renew DHCP Lease: Fix Wi-Fi "No Internet" Errors
If your iPhone is connected to Wi-Fi but shows "No Internet Connection" or web pages won't load, your DHCP lease is likely stale or there's an IP conflict on your network. Renewing the lease forces your router to assign your iPhone a fresh local IP address — often fixing the problem instantly.
What is a DHCP lease? When your iPhone connects to Wi-Fi, your router assigns it a local IP address for a set period — the lease time. When that lease expires, or when the router is restarted, or when too many devices compete for the same IPs, conflicts can occur. Renewing forces a clean reassignment.
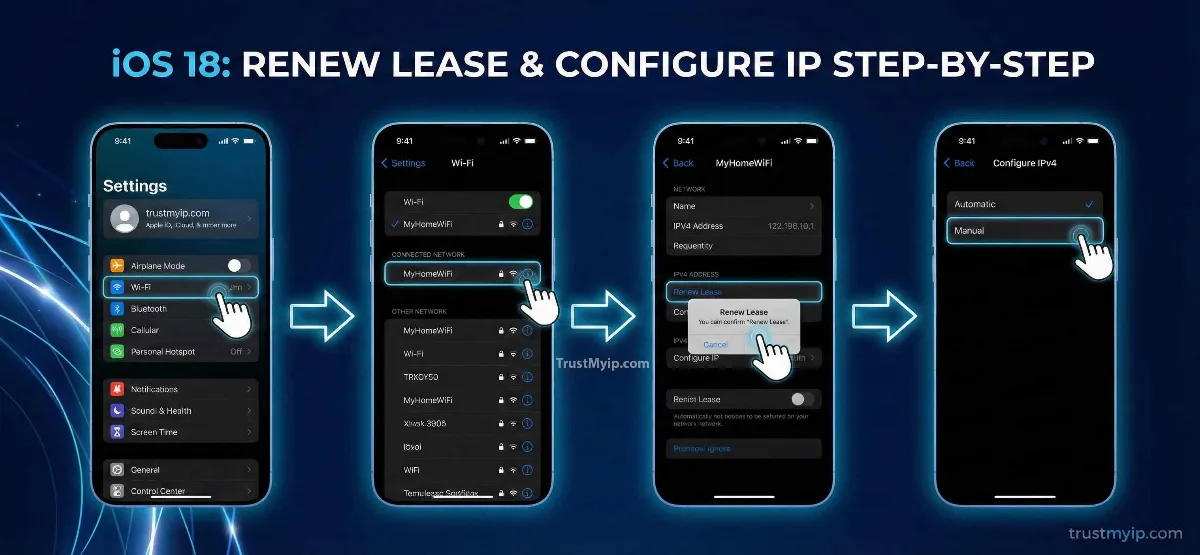
Steps to Renew DHCP Lease on iPhone
- 1Open Settings → tap Wi-Fi.
- 2Tap the ⓘ blue info icon next to your connected network name.
- 3Scroll down and tap Renew Lease.
- 4Tap Renew Lease again on the confirmation prompt.
- 5Wait 5-10 seconds for the network to reassign your IP. Test your connection.
Remember: This only changes your local IP within your home network. Your public IP — what websites see — remains unchanged. Use our IP checker to confirm your public IP before and after.
5. Method 4 — Static IP: For Port Forwarding and Smart Home Setups
A static (manual) local IP assigns your iPhone a permanent, fixed address on your home network that never changes. This is necessary when your router needs to reliably identify your iPhone for features like port forwarding, network access controls, or integrations with smart home systems.
Without a static IP, your router may assign your iPhone a different local IP every time it reconnects, breaking any rules you've configured that reference the old IP address. A static IP solves this permanently.
Configuration Steps (iOS 18/26)
- 1. Settings → Wi-Fi → tap ⓘ next to your network.
- 2. Tap Configure IP → select Manual.
- 3. Enter your chosen IP Address (e.g. 192.168.1.150 — pick one outside your router's DHCP range to avoid conflicts).
- 4. Enter Subnet Mask: typically 255.255.255.0.
- 5. Enter Router (gateway): your router's IP, usually 192.168.1.1 or 192.168.0.1.
- 6. Tap Save. Test your internet connection.
When to Use Static IP
- ✅ Port forwarding — router rules need a permanent target IP
- ✅ Smart home control — Home app, HomeKit, or third-party automation
- ✅ Parental controls — router-level rules tied to your iPhone's IP
- ✅ Network monitoring — consistent device identification in router logs
- ❌ Not for privacy — websites never see your local IP regardless
- ❌ Not for geo-unblocking — public IP remains unchanged
6. Method 5 — Airplane Mode Trick: Cellular IP Cycling
The Airplane Mode trick is the fastest way to attempt a public IP change when using cellular data. By toggling Airplane Mode on for 60 seconds, your iPhone disconnects from the cell tower completely. When it reconnects, the carrier's DHCP system may assign a new IP from its pool.
Why this works: Cellular carriers assign IPs dynamically. When you reconnect, the system doesn't necessarily give you back the same address — you may receive a different one from the carrier's regional pool.
Why this often doesn't work as expected: Most major US carriers (AT&T, Verizon, T-Mobile) use Carrier-Grade NAT (CGNAT). Under CGNAT, your device doesn't get a unique public IP at all — hundreds of iPhones share a single public IP address from the carrier's pool. Toggling Airplane Mode will give you a different private carrier IP, but the public IP websites see may stay within the same shared CGNAT range.
Airplane Mode IP Change — Step by Step
1. Make sure you're on cellular data (not Wi-Fi) — this trick only works for cellular IPs.
2. Open Settings → toggle Airplane Mode ON.
3. Wait 60 seconds — a full minute ensures the carrier releases your session.
4. Toggle Airplane Mode OFF and wait for the cellular connection to re-establish (5G/LTE icon appears).
5. Check your new IP at TrustMyIP.com. If it's unchanged, your carrier likely uses CGNAT — only a VPN will give you a genuinely different public IP.
7. CGNAT: The Real Reason Your iPhone IP Won't Change
Carrier-Grade NAT (CGNAT) is the single biggest reason iPhone users fail to change their cellular IP — and it's something almost no mainstream guide explains properly. Understanding it saves hours of frustration.
IPv4 addresses are exhausted. There are only ~4.3 billion IPv4 addresses globally, and the internet ran out of them years ago. To cope, major carriers place hundreds or even thousands of customers behind a single public IP address using CGNAT. Your iPhone gets a private "carrier IP" in the 100.64.0.0/10 range, and the carrier translates this into a shared public IP before traffic reaches the internet.
| Carrier | CGNAT Usage | Airplane Mode Effectiveness | Best Fix for Unique IP |
|---|---|---|---|
| T-Mobile (US) | Heavy CGNAT usage | Rotates within shared pool | VPN only |
| AT&T (US) | Moderate CGNAT | May get different IP | VPN recommended |
| Verizon (US) | Moderate CGNAT | Variable results | VPN recommended |
| Most MVNOs (US) | Almost always CGNAT | Rarely effective | VPN only |
How to check if you're behind CGNAT: Connect to cellular data. Check your IP at our IP checker. Then check your iPhone's internal cellular IP in Settings → Cellular → Cellular Data Network (varies by carrier). If the public IP doesn't match and starts with 100.64.x.x ranges — you're behind CGNAT. The only practical solution is a VPN. Understand more about how your IP exposes data with our guide on what websites can see from your IP.
8. Apple's Privacy Features in 2026: What's New for IP Protection
Apple has made significant moves in 2026 that directly affect iPhone IP privacy. Here is what changed and what it means for you.
📍 Carrier Location Precision Limits (iOS 18.3 / Early 2026)
Apple added a new privacy layer that limits the precision of location data shared with mobile carriers. Previously, cellular carriers could collect detailed location data as part of normal network operations — data that US regulators fined major carriers nearly $200 million for improperly sharing in 2024. This update reduces carrier-level location tracking, closing a privacy gap that existed outside of app-based permissions. Your carrier now receives less precise location information from your iPhone's signal.
🔒 Private Wi-Fi Address (MAC Randomization) — Refined in iOS 18
First introduced in iOS 14 and refined across every update, Private Wi-Fi Address randomises your iPhone's MAC address per network. This is often confused with an IP change — they are different things. MAC randomization prevents store and corporate Wi-Fi networks from tracking your iPhone across locations or return visits. It does not change or hide your IP address. To enable: Settings → Wi-Fi → tap ⓘ → ensure "Private Wi-Fi Address" is on (it should be by default).
🤖 iOS 26 (WWDC 2026 — Upcoming): Private Cloud Compute
Apple's upcoming iOS 26 (announced WWDC June 2026) deepens Apple Intelligence privacy by routing AI processing through Private Cloud Compute — specialized Apple Silicon servers where even Apple cannot access your data. When on-device processing isn't sufficient, queries are processed in encrypted form and never stored. While this primarily covers AI features rather than IP privacy specifically, it represents Apple's broader commitment to ensuring user data — including network activity — remains private in the iOS 26 ecosystem.
💬 RCS End-to-End Encryption (iOS 26.5 — Coming Soon)
iOS 26.5 (expected late May 2026) adds end-to-end encryption for RCS messages between iPhones and Android devices. This is a messaging privacy improvement, not an IP change — but it closes another vector through which metadata about your communications could leak, complementing IP privacy strategies.
9. Private Wi-Fi Address vs IP Address Change: The Difference That Matters
These two features are consistently confused, even in tech articles. Here is the clear breakdown.
| Feature | What It Changes | Who It Hides You From | Protects Against |
|---|---|---|---|
| Private Wi-Fi Address | Your MAC address per network | Wi-Fi network operators | Cross-location tracking by Wi-Fi networks (e.g. malls, coffee shops) |
| IP Address Change (VPN) | Your public IP address | All websites and online services | Location detection, tracking, geo-restrictions, IP-based profiling |
| iCloud Private Relay | IP shown in Safari requests | Websites accessed via Safari | Safari browsing profiling by websites and network providers |
| Location Services (Off) | GPS data sent to apps | All apps requesting location | GPS tracking — independent from IP tracking |
The bottom line: for true privacy in 2026, you need layers. Turn off Location Services for apps that don't need it. Enable Private Wi-Fi Address. Use a VPN for full-device IP masking. And use iCloud Private Relay as an additional Safari layer if you're an iCloud+ subscriber. No single feature does everything. Check your DNS privacy settings with our DNS lookup tool to see if your DNS queries are leaking even when your VPN is active.
10. Why Your iPhone IP Still Won't Change: Troubleshooting Guide
You've tried the methods above but your IP looks the same. Here are the real reasons why, and exactly what to do.
❌ Your carrier uses CGNAT
Symptom: Airplane Mode doesn't change your public IP, or you keep getting IPs from the same region/pool.
Fix: Only a VPN will reliably change what websites see. Airplane Mode only cycles your carrier-internal IP, not the shared public IP your carrier presents to the internet.
⚠️ Location Services overriding IP privacy
Symptom: Your IP shows one location but apps still serve you geo-targeted content.
Fix: Settings → Privacy & Security → Location Services. Review which apps have "Always" or "While Using" access. GPS location and IP location are independent — a VPN changes the IP but not the GPS signal. Disable location for apps where privacy is paramount.
⚠️ DNS caching revealing old identity
Symptom: VPN is connected but some sites still show your real location.
Fix: Restart your iPhone to flush the DNS cache. Also check: does your VPN have DNS leak protection enabled? Test at TrustMyIP DNS lookup — your DNS queries should route through the VPN server, not your ISP's DNS.
❌ VPN + Private Relay conflict
Symptom: VPN connects but internet stops working, or Private Relay shows "incompatible with system settings" alert.
Fix: Disable iCloud Private Relay when using a VPN. Settings → [Your Name] → iCloud → Private Relay → Turn Off Until Tomorrow. They conflict at the network level — use only one.
🔵 ISP static IP assignment
Symptom: Home Wi-Fi IP never changes even after router restart and DHCP renewal.
Fix: Contact your ISP — you may have a static IP assignment (common on business plans). To get a dynamic IP instead, request it from your ISP. Alternatively, a VPN bypasses this entirely for privacy purposes.
Conclusion: Choose the Right Method for Your Goal
Knowing how to change your IP address on iPhone in 2026 means understanding the tools — not just following steps blindly. The right method depends entirely on what you're trying to achieve. For genuine public IP privacy and geo-unblocking across all apps, a VPN is the only reliable solution. For Safari-specific privacy without a third-party app, iCloud Private Relay delivers a strong dual-hop architecture — but know its limits. For connectivity fixes on your home Wi-Fi, renewing your DHCP lease takes 10 seconds. For permanent smart home setups, a static IP prevents address conflicts. And for cellular IP cycling, the Airplane Mode trick works — but CGNAT on most US carriers limits its real-world impact.
In 2026, Apple has strengthened iPhone privacy considerably — carrier location precision limits, MAC randomization, and Private Cloud Compute for AI processing all add meaningful layers. But no single feature is a complete solution. True iPhone IP privacy requires understanding what each tool does, what it doesn't cover, and layering them appropriately. Start by checking what your current IP reveals with our IP address checker — then apply the methods above accordingly. For deeper privacy, explore our guide on how to hide your IP address for free and our VPN vs proxy comparison.
Is Your iPhone Leaking?
Audit your public IP, test for DNS leaks, and see exactly what your iPhone reveals to every website you visit — all in one click.