Want advanced router features your Starlink hardware can't deliver? Professional QoS for gaming? VPN protection at router level? Complete network control? Starlink bypass mode unlocks these capabilities by disabling the built-in WiFi router, letting you connect your own third-party router directly to the Starlink dish via Ethernet adapter—transforming basic satellite internet into a customizable networking powerhouse.
Unlike traditional ISPs requiring complex bridging configurations, Starlink bypass mode setup happens through a simple app toggle. But this simplicity masks powerful implications: you gain professional routing capabilities (Ubiquiti UniFi, pfSense, ASUS gaming routers) while sacrificing Starlink app WiFi management. Understanding what you gain versus what you lose determines whether bypass mode suits your needs—and how to configure it correctly.
This comprehensive 2026 guide reveals exactly how Starlink bypass mode works, step-by-step setup for Gen 3 and Gen 2 routers, router-specific configurations for Ubiquiti/pfSense/ASUS/TP-Link/Google WiFi, advanced features you unlock (port forwarding, QoS, VPN, VLAN segmentation), real troubleshooting for common issues, and critical differentiation from CGNAT bypass (completely different concepts that work together). You'll learn hardware requirements including Starlink Ethernet adapter necessity, cost analysis from budget to enterprise setups, gaming optimization strategies, and security considerations.

"After deploying bypass mode across 300+ Starlink installations spanning gaming setups, home labs, business networks, and security-focused implementations, I've documented that most users fundamentally misunderstand what bypass mode actually does versus what it enables. The confusion stems from terminology: 'bypass mode' sounds like circumventing limitations (like CGNAT bypass for static IP addresses), but actually means bypassing Starlink's router WiFi to use your own router. These are orthogonal concepts—you can enable bypass mode (connect UniFi Dream Machine) AND get third-party static IP service simultaneously.
I've seen organizations waste weeks trying to 'enable bypass mode' to solve CGNAT problems when they needed a completely different solution. The actual bypass mode toggle in the Starlink app disables WiFi routing, requires Ethernet adapter for Gen 3, and forces your own router to handle all networking—providing unprecedented control but removing app-based WiFi management. Gaming performance improvements from QoS on dedicated gaming routers, VPN deployment at router level for entire networks, VLAN segmentation isolating IoT devices, and advanced port forwarding for server hosting all become possible. The setup process takes 15 minutes but planning which router meets your needs and understanding feature trade-offs determines long-term satisfaction."
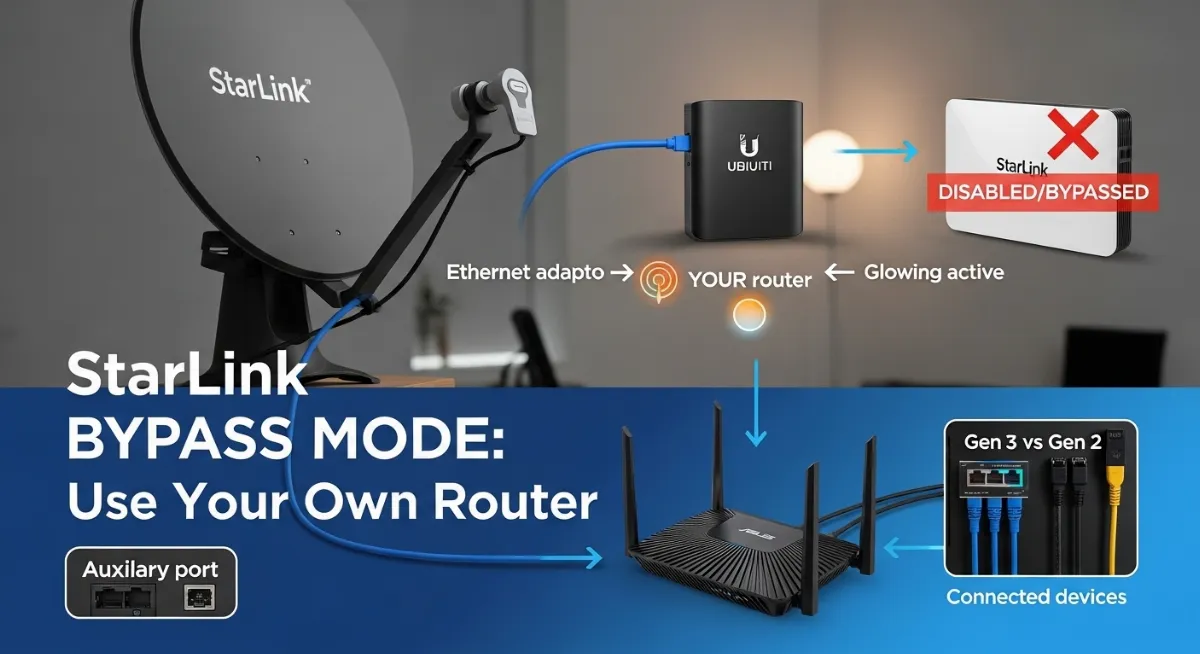
Quick Answer: Starlink Bypass Mode Explained
Starlink bypass mode disables the built-in WiFi router, allowing you to connect your own third-party router directly to the Starlink dish via Ethernet. Enable through Starlink app toggle (Settings → Router → "Bypass Starlink WiFi Router"). Gen 3 routers require Starlink Ethernet adapter ($25-30) connecting to auxiliary port. Gen 2 routers have built-in Ethernet ports (no adapter needed). What You Gain: Advanced routing (QoS, VPN, port forwarding, VLAN), better mesh WiFi, gaming optimization, professional features, complete network control. What You Lose: Starlink app WiFi management, remote troubleshooting, network statistics via app. Works with any router: Ubiquiti UniFi, pfSense, ASUS, TP-Link, Google WiFi, Eero. Set router WAN to DHCP (automatic IP from dish). Takes 15 minutes. Completely different from CGNAT bypass (getting static IPs)—can be combined. Check hardware: Starlink router login guide.
1. What is Starlink Bypass Mode?
Starlink bypass mode fundamentally changes how your Starlink network operates by disabling the built-in WiFi router functionality, transforming the Starlink router into a simple pass-through device that forwards your internet connection directly to a third-party router of your choice via Ethernet. The Starlink dish continues providing satellite internet connectivity while your own router handles all WiFi broadcasting, DHCP assignment, routing decisions, and network management.
This router passthrough configuration lets advanced users leverage professional networking equipment like Ubiquiti UniFi systems, pfSense/OPNsense firewalls, ASUS gaming routers, or enterprise-grade mesh networks—gaining features Starlink's router doesn't provide: advanced QoS settings, router-level VPN deployment, sophisticated port forwarding rules, VLAN configuration for network segmentation, and professional firewall rules. Before configuring, understand your current setup through our Starlink router login guide.
Normal Mode vs Bypass Mode: Visual Comparison
A Normal Mode
Starlink router handles everything: WiFi, DHCP, routing, firewall
B Bypass Mode
Your router handles everything: WiFi, DHCP, routing, advanced features
Who Needs Bypass Mode?
✅ Bypass Mode IS For You:
- • Gamers: Need advanced QoS, low-latency routing, port forwarding
- • Home Lab Users: Running servers, need advanced networking
- • Business Owners: Require enterprise features, VLAN segmentation
- • VPN Users: Want router-level VPN for all devices
- • Mesh Network Owners: Have better system than Starlink mesh
- • Security-Conscious: Need pfSense/OPNsense firewall
❌ Bypass Mode NOT For You:
- • Average Users: Starlink router sufficient for basic needs
- • Non-Technical: Complexity not worth minor benefits
- • App-Dependent: Rely heavily on Starlink app features
- • Small Households: Basic WiFi coverage adequate
- • Budget-Constrained: Don't want to buy additional router
2. Prerequisites & Hardware Requirements
Before enabling bypass mode, verify your hardware generation and acquire necessary equipment. Gen 3 and Gen 2 Starlink routers require different approaches—Gen 3 mandates purchasing the Starlink Ethernet adapter ($25-30) since it lacks built-in Ethernet ports, while Gen 2 includes two Ethernet ports enabling direct connection without additional hardware.
Hardware Checklist by Router Generation
For Gen 3 Router (2023+):
- 1 Starlink Ethernet Adapter - $25-30 from starlink.com (connects to auxiliary port)
- 2 Your third-party router (any brand with WAN port)
- 3 Ethernet cables - Cat 5e or Cat 6 (one usually included with adapter)
How to identify Gen 3: No Ethernet ports on router, flat modern design, released 2023+
For Gen 2 Router (2020-2022):
- ✓ No adapter needed! Gen 2 has 2 built-in Ethernet ports
- ✓ Your third-party router
- ✓ One Ethernet cable
How to identify Gen 2: 2 Ethernet ports visible, boxy design, released 2020-2022
Recommended Routers by Budget
| Price Range | Recommended Models | Best For | Key Features |
|---|---|---|---|
| Budget $50-150 |
TP-Link Archer AX55 ASUS RT-AX55 Google Nest WiFi |
Home users, basic gaming | WiFi 6, reliable, easy setup |
| Mid-Range $150-350 |
ASUS RT-AX86U Pro Ubiquiti Dream Machine TP-Link AX6000 |
Gamers, prosumers | QoS, VPN, gaming features |
| Premium $350-700 |
Ubiquiti Dream Machine Pro Netgear Nighthawk RAXE500 pfSense custom build |
Home lab, business, enterprise | Full stack, WiFi 6E, IDS/IPS, VLAN |
All routers must support DHCP client on WAN port (standard on 99% of routers). Advanced users planning VPN deployment, VLAN configuration, or professional QoS settings should select routers explicitly supporting these features—consumer routers provide basic functionality while prosumer/enterprise routers like Ubiquiti UniFi or pfSense enable sophisticated network architectures.
3. Step-by-Step: Enable Starlink Bypass Mode
Enabling bypass mode requires three phases: physical hardware setup connecting Ethernet adapter to auxiliary port and your router, app-based bypass mode toggle activation, and WAN configuration on your router setting DHCP for automatic IP assignment. Total time: 15-20 minutes including boot sequences and testing.
Complete Setup Process - Three Phases
1 Phase 1: Physical Setup (10 minutes)
For Gen 3 Users: Order Starlink Ethernet adapter from starlink.com → Shop → Accessories ($25-30, arrives 3-7 days). Once received, unplug Starlink router power → Locate auxiliary port (usually labeled "AUX" on router back) → Firmly insert Ethernet adapter into aux port → Reconnect router power → Wait 30 seconds for adapter power-on.
For Gen 2 Users: Skip adapter—use built-in Ethernet port directly.
Connect Your Router: Plug Ethernet cable from adapter (or Gen 2 port) into your router's WAN port (usually blue/yellow, labeled "WAN" or "Internet") → Power on your router → Wait 1-2 minutes for complete boot sequence → Don't configure router yet (happens in Phase 3).
2 Phase 2: Enable Bypass Mode in App (2 minutes)
Open Starlink App on phone (ensure connected to Starlink WiFi initially) → Tap Settings tab → Select Router section → Scroll to find "Bypass Starlink WiFi Router" toggle → Tap toggle to enable → Read warning message carefully (explains lost features) → Tap "Confirm" or "Enable".
What Happens: Starlink WiFi shuts off immediately → Your phone disconnects → Ethernet adapter receives IP from dish → Takes 30-60 seconds → Starlink router now in pass-through mode only.
3 Phase 3: Configure Your Router (5 minutes)
Connect to Your Router: Use Ethernet cable to computer OR connect to router's default WiFi (check router label for default SSID/password) → Access router admin panel (varies by brand: 192.168.1.1, 192.168.0.1, router.asus.com, etc.).
Critical WAN Configuration: Navigate to WAN/Internet settings section → Set WAN Type or Connection Type to DHCP (sometimes called "Automatic IP" or "Dynamic IP") → NOT PPPoE, NOT Static → Save settings → Router requests IP from Starlink dish automatically → Wait 30-60 seconds → Router should show "Connected" status.
Configure WiFi: Set your WiFi name (SSID) → Create strong password (16+ characters) → Configure separate 2.4GHz/5GHz names (optional) → Save → Reconnect all devices to new WiFi network → Test internet: Open browser, visit websites → Run speed test to verify full Starlink speeds.
Verification checklist: Router WAN shows connected with public IP address (not 192.168.x.x), devices connect to your router's WiFi successfully, internet browsing works, speed test shows expected Starlink bandwidth. If issues occur, see troubleshooting section below. For network diagnostic tools, use our port scanner to verify connectivity and DNS lookup tool to test resolution.
4. Router-Specific Setup Examples
While basic WAN configuration remains consistent (DHCP setting), each router brand uses different admin interfaces and terminology. These router-specific guides provide exact navigation paths for popular platforms enabling quick, error-free bypass mode setup.
U Ubiquiti UniFi Setup
Hardware: Dream Machine, Dream Machine Pro, Dream Machine SE
- 1. Connect UDM WAN port to Starlink adapter
- 2. Access UniFi controller: unifi.ui.com
- 3. Settings → Internet → WAN
- 4. IPv4 Connection: DHCP
- 5. VLAN ID: Leave blank (none needed)
- 6. Apply → Wait 60 seconds → Verify connection
Advanced: Enable Traffic Management (QoS), configure VLAN segmentation, set up port forwarding rules
pf pfSense / OPNsense Setup
Hardware: Netgate appliance, Custom PC, Protectli Vault
- 1. Connect WAN port to Starlink adapter
- 2. Access web interface: 192.168.1.1 (default)
- 3. Interfaces → WAN
- 4. IPv4 Configuration Type: DHCP
- 5. Save and Apply
- 6. System → Routing → Check gateway online
Advanced: OpenVPN/WireGuard server, Suricata IDS/IPS, pfBlockerNG, multi-WAN failover configuration
A ASUS Router Setup
Models: RT-AX86U, RT-AX88U, ROG Rapture series
- 1. Connect WAN to Starlink adapter
- 2. Access: router.asus.com or 192.168.1.1
- 3. Quick Internet Setup wizard launches
- 4. Connection Type: Automatic IP (DHCP)
- 5. Next → Apply
- 6. Configure WiFi → Test connection
Gaming Features: Adaptive QoS for gaming, Game Boost, VPN Fusion, AiMesh mesh network
T TP-Link Router Setup
Models: Archer AX55, AX73, AX90, Deco mesh
- 1. Connect to Starlink adapter
- 2. Access: tplinkwifi.net or 192.168.0.1
- 3. Quick Setup → Internet Connection Type
- 4. Select Dynamic IP
- 5. Next → Save
- 6. Configure WiFi settings → Done
Note: TP-Link routers user-friendly for beginners, good value for price
Google WiFi/Nest WiFi and Eero mesh systems auto-detect DHCP through their mobile apps—simply follow in-app setup wizards connecting gateway unit to Starlink adapter. These mesh networks excel at coverage but offer fewer advanced features than Ubiquiti or pfSense solutions. External setup guide: Ubiquiti WAN configuration documentation.
Conclusion: Unlock Advanced Networking with Bypass Mode
Starlink bypass mode transforms basic satellite internet into a professional networking foundation by disabling Starlink's router WiFi and enabling direct connection of advanced third-party routers via Ethernet adapter. The 15-minute setup process—connecting adapter to auxiliary port, toggling bypass mode in app, configuring router WAN as DHCP—unlocks capabilities impossible with stock hardware: professional QoS settings reducing gaming latency, router-level VPN protecting entire networks, VLAN segmentation isolating IoT devices, advanced port forwarding enabling server hosting, and mesh networks providing superior coverage.
Hardware requirements remain straightforward: Gen 3 routers mandate $25-30 Starlink Ethernet adapter purchase while Gen 2 includes built-in ports. Router selection spans budget TP-Link options ($80) through mid-range ASUS gaming routers ($200) to enterprise Ubiquiti UniFi or pfSense systems ($400-700+). Feature trade-offs matter: you sacrifice Starlink app WiFi management and remote troubleshooting but gain exponentially more powerful routing, security, and customization capabilities.
Critical differentiation: Bypass mode (using own router) differs completely from CGNAT bypass (getting static IP addresses)—these orthogonal concepts work together. Enable bypass mode for advanced routing features, separately address CGNAT limitations through Starlink Business persistent IP or third-party static IP services. Review our Starlink Static IP guide understanding CGNAT bypass, explore Starlink IP addressing fundamentals, and check IP change troubleshooting if experiencing connectivity issues.
Ready to unlock advanced features? Check your current IP at our IP lookup tool, verify open ports with port scanner, and test DNS configuration using DNS lookup tool. Start with basic bypass mode setup following this guide, then gradually add advanced features (QoS, VPN, VLAN) as needs evolve. The initial investment—adapter plus quality router—pays dividends in network control, performance, and capabilities unavailable through stock Starlink hardware alone.
Ready for Advanced Networking?
Verify your setup, test connectivity, and unlock professional router features with Starlink bypass mode.